It is important that every computer on a network has access to certain information. If you use simple configuration files, each host will need exactly the same information at all times. However, for large and dynamic networks, this is simply impractical because the information is complex and constantly changing. The Network Information Server (NIS) solves this problem by maintaining network information in a database on a server. Any client on the network can then access the database for information on hosts, users, passwords, and more.
Requirements for a client to use NIS
In order for a client to use NIS, it must be running two daemons.
The first daemon, portmap, allows applications running on the NIS client computer to obtain network information from the NIS server.
The second daemon, ypbind, is the NIS client daemon itself.
The "yp" found in most NIS tool names stands for Yellow Pages(tm), the former name of NIS.
You can think of NIS as a similar type of information resource for your network.
portmap daemon in Red Hat Linux
The portmap daemon in Red Hat Linux serves as a mediator between network services and the port numbers they use. It is responsible for mapping port numbers to the correct network service on a server, allowing clients to connect to the correct service using the correct port number. The portmap daemon listens on the well-known port 111 and responds to queries from client programs requesting information about network services. This information is then used by client programs to establish connections to network services running on the server. The portmap daemon is an essential component of the RPC (Remote Procedure Call) system used by many network services in Red Hat Linux.
NIS Network Structure:
NIS servers store information in databases, sometimes called maps. For example, you can have maps of hostnames to IP addresses, or users to passwords. Each map has a master server. This server is responsible for keeping all information up-to-date and available to clients. You can also set up slave servers, which merely keep an accurate copy of the master's database and handle NIS requests when the master is busy.
The following series of images below explores some different ways NIS networks are organized.
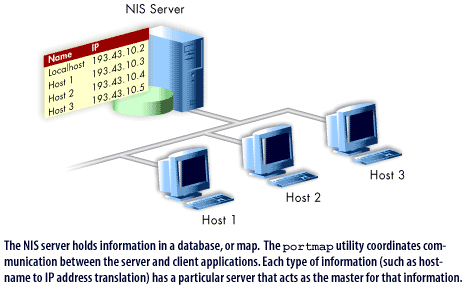
1. The NIS Server holds information in a database or map. The portmap utility coordinates communication between the server and client applications. Each type of information (such has host-name to IP address translation) has a particular server that acts as the master for that information.
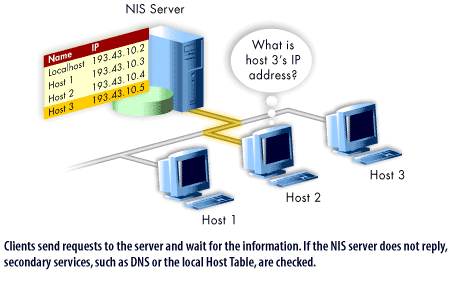
2. Clients send requests to the server and wait for the information. If the NIS server does not reply, secondary services, such as DNS or the local Host Table are checked.
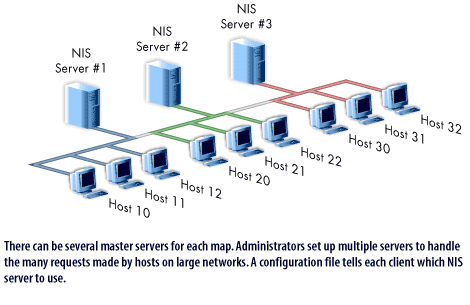
3. There can be several master servers for each map. Administrators set up multiple servers to handle the many requests made by hosts on large networks. A configuration file tells each client which NIS server to use.
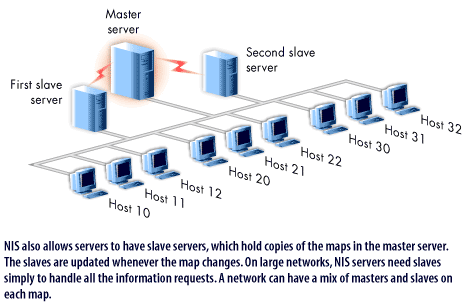
4. NIS also allows servers to have slave servers, which hold copies of the maps in the master server.
The slaves are updated whenever the map changes.
On large networks, NIS servers need slaves simply to handle all the information requests. A network can have a mix of masters and slaves on each map.
Network Information Server (NIS) in Red Hat: Database Configuration and Client Utilization
The Network Information Server (NIS) is a directory service protocol designed for distributing system configuration data such as user account information, hostnames, and IP addresses across a computer network. Within the Red Hat ecosystem, NIS is a critical component for maintaining centralized control over multiple Unix-based clients. This guide aims to detail the fundamentals of how NIS stores data and how clients interact with it, particularly focusing on Red Hat's implementation.
NIS Database Architecture: NIS manages data through a specialized set of databases, commonly referred to as 'maps.' These maps contain key-value pairs that facilitate the mapping of various network resources and configuration settings. Specifically, these maps are flat-file ASCII databases derived from the /etc files like `/etc/passwd`, `/etc/group`, and `/etc/hosts`.
NIS Master Server and Slave Servers: In an NIS domain, one NIS server is designated as the master server, which holds the authoritative copies of the NIS maps. Slave servers may also exist to provide fault tolerance; they hold replicated copies of the NIS maps from the master server. Changes are propagated to slave servers through NIS map propagation mechanisms.
Map Compiling: On the NIS master server, the `ypinit` and `ypmake` commands are used to initialize and compile the NIS maps. The maps are typically stored in the `/var/yp/` directory and are suffixed with `.dir` and `.pag` to form a dbm-style database.
Configuring NIS Client in Red Hat: Configuring a Red Hat system to utilize an NIS service involves specifying the NIS domain and associating it with the appropriate NIS server.
Below are the steps required to configure the NIS client on Red Hat:
Install NIS Packages: Ensure that the necessary packages are installed using the following command:
yum install ypbind yp-tools
Specify NIS Domain:
Edit the `/etc/yp.conf` file to specify the NIS server:
	domain
	<NIS-Domain-Name>
	server <NIS-Server-Hostname-Or-IP>
Modify NSSwitch Configuration
Edit the `/etc/nsswitch.conf` file to enable NIS lookups for various services like `passwd`, `group`, and `shadow`:
Activate NIS Service:
Start the `ypbind` service and enable it at boot:
	systemctl start ypbind
	systemctl enable ypbind
Test Configuration:
Utilize commands like `ypcat` and `ypmatch` to test the connection and data retrieval from the NIS server.
	ypcat passwd
	ypmatch username passwd
The Network Information Server (NIS) maintains a robust and centralized configuration database encapsulated in various NIS maps. These maps act as a comprehensive reference table for network resources and configuration settings. Red Hat administrators must understand the intricacies of these databases to properly configure and manage NIS client systems, thereby ensuring seamless network operations and centralized management.
Primary Characteristics of NIS Server in Red Hat
The Network Information System (NIS) server is a client-server networking protocol used in Red Hat Linux to manage user and group information across a network. The primary characteristics of the NIS server in Red Hat Linux include:
Centralized user and group management: The NIS server provides a centralized database of user and group information that can be accessed by NIS clients on the network. This allows users to log in to any machine on the network using their NIS username and password, and access their files and applications.
Scalability: The NIS server is highly scalable and can be used to manage user and group information across large networks with hundreds or thousands of users.
Security: The NIS server is designed to be secure, and user and group information is encrypted when it is transmitted between the server and clients. However, because the NIS protocol is relatively old, it may not provide the same level of security as newer protocols.
Customizability: The NIS server is highly customizable, and administrators can configure the NIS database to include custom user and group information as needed. This allows for a high degree of flexibility in managing user and group information on the network.
Compatibility: The NIS protocol is widely supported on a variety of operating systems, including Red Hat Linux, Unix, and macOS. This makes it a popular choice for managing user and group information across heterogeneous networks.
Administration: The NIS server can be administered using a variety of tools, including command-line utilities and graphical user interfaces. This allows system administrators to easily manage the NIS database and configure the NIS server as needed.
The NIS server provides a powerful and flexible way to manage user and group information across a network, with support for large networks, customizability, and compatibility with a wide range of operating systems.
Defining an NIS domain name
You can set your Red Hat Linux computer's NIS domain name using the domainname command. For example, if your NIS domain name were ooportal, you could set it by typing the following as the root user from the shell:
domainname cplusoop
Set NIS domain name:
To verify that your NIS domain name is set, simply type domainname and you will see the name. Unfortunately, you are not done yet. Running domainname does not set the NIS domain name permanently. As soon as you reboot the computer, it is gone. (You can verify this by typing domainname again.) To make the NIS domain name permanent, you need to have the domainname command run automatically each time your system boots. There are many ways to do this. What I did was add the command line (domainname trident) to a run−level script that runs before the ypbind daemon is started. I edited the /etc/init.d/network file and added the following lines just after the first set of comment lines (about line number 9).
# Set the NIS domain name.
domainname trident
This caused my NIS domain name to be set each time my Red Hat Linux system booted. When you add this entry, make sure you spell the NIS domain name properly (including upper- and lowercase letters). If you get it slightly wrong, you will see ypbind failure messages when you boot.
Caution: Be very careful editing a run level script. Make a copy before you edit it.
If you make a mistake editing one of these files, you could find yourself with a network or other essential service that does not work.
The next lesson shows you how to obtain information about the network.